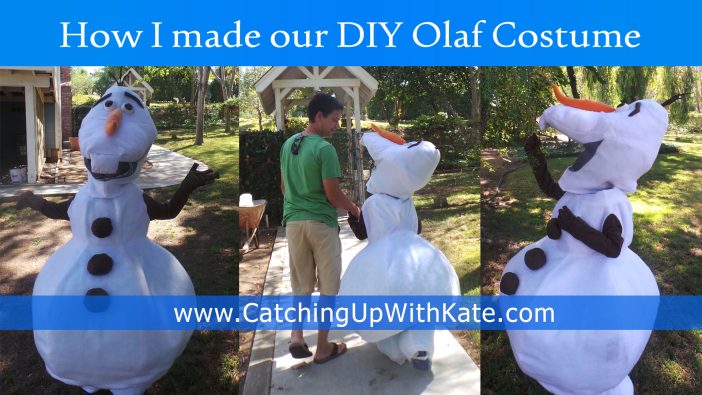
DIY Olaf Costume Instructions
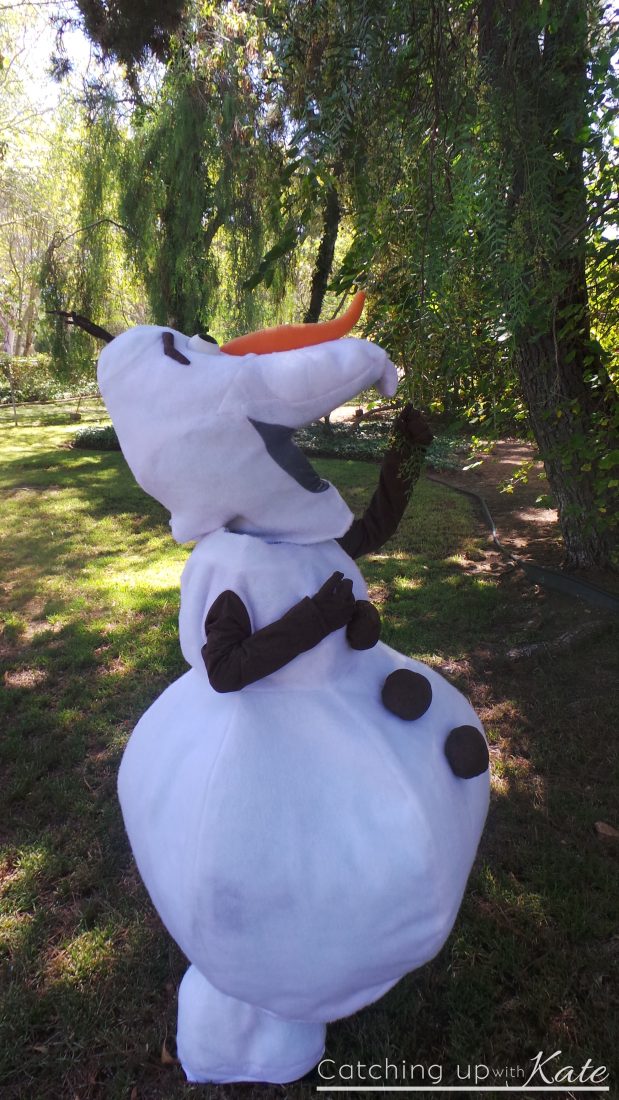
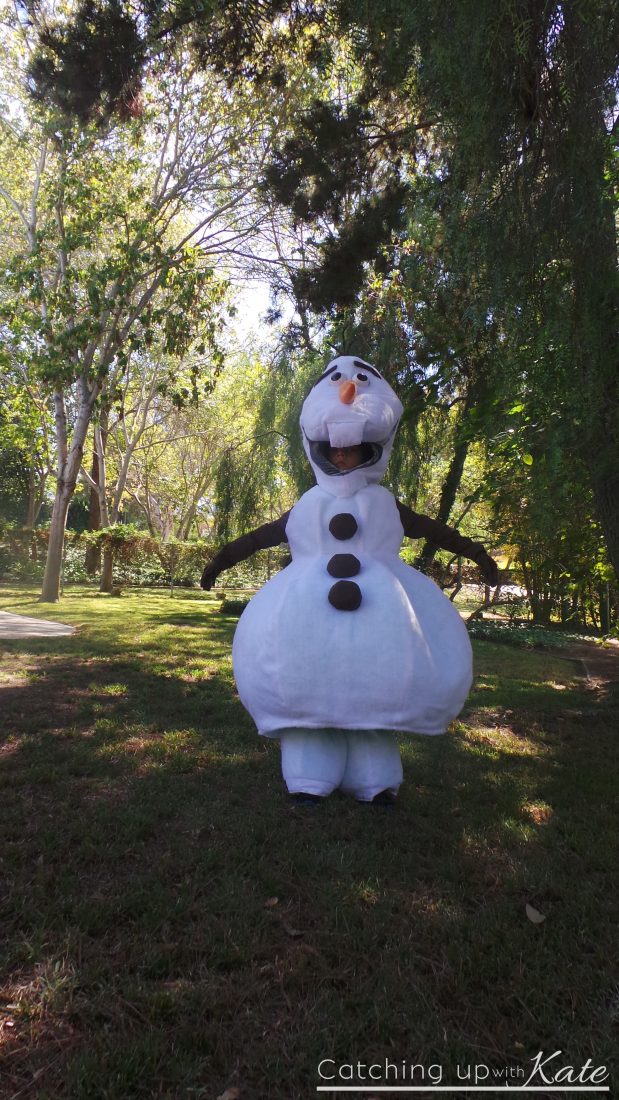
With Frozen 2 coming to theaters in November, we are sure Olaf is going to be a popular costume choice! Everyone’s favorite snowman is such a fun character to see trick or treating! If you would like an over the top costume this Halloween, this giant homemade Olaf costume is it! We went a little over board and made detailed instructions for anyone who is looking for a challenging DIY costume. While many of our Disney inspired costumes are simple and do not involve sewing, this costume is a bit more complex! Please check out our award winning Olaf costume. I hope you are inspired to build your own snowman.
DIY OLAF Costume Instructions
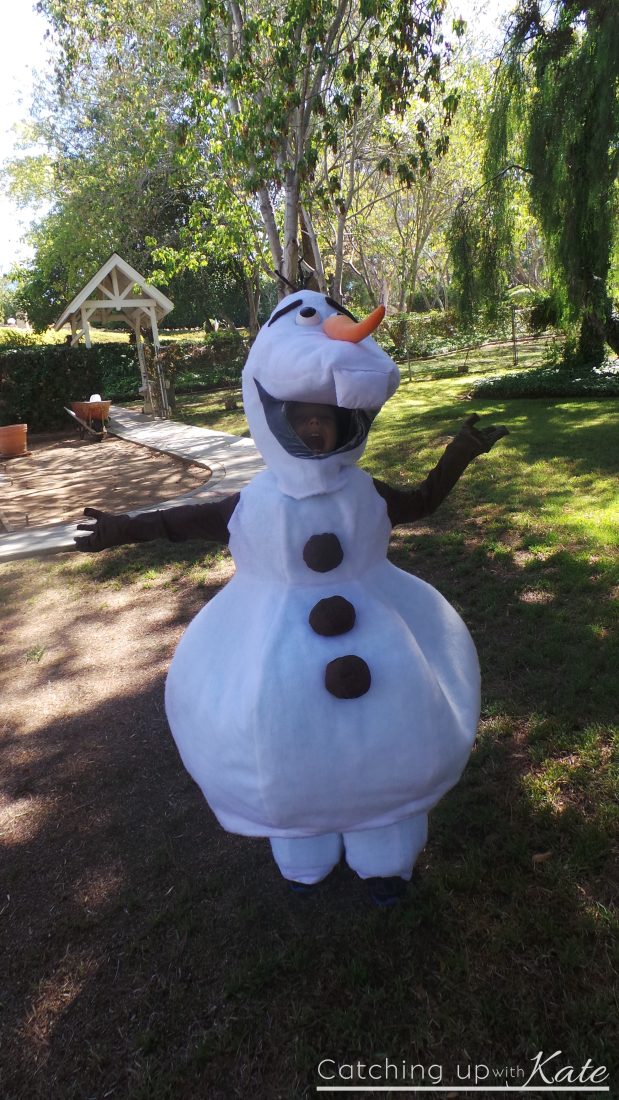
When my son asked for a DIY Olaf Costume for Mickey’s Halloween Party this year we had no idea the beast of a project we were signing up for. My husband and mom made this incredible costume and as you might imagine it has been very popular. Many people who loved our little Olaf inspired snowman costume have asked for step by step instructions. Because my husband never anticipated it being quite this popular he had to retrace his steps a bit and I am so thankful he was willing to put out this instruction guide. Here is DIY Olaf Costume Instructions just for you, our lovely readers!
Please note he changed a few things about this how to than what he actually did, because if he had it to make again he thinks the instructions here would have made it easier. My husband is not a pattern or costume maker so those of you that are might think “What the heck?”, but it worked so go with it. This Olaf costume is just a general guide and I highly suggest reading through it first before starting. Please feel free to ask questions in the comment section and he will do his best to answer if you have any trouble while attempting your own DIY Olaf costume! This is not a Disney sponsored post in any way, we are just gigantic Disney Frozen fans and my son ‘had to’ be Olaf and we just went a little over the top.
So I gotta ask…. “Do you wanna build a snowman?”
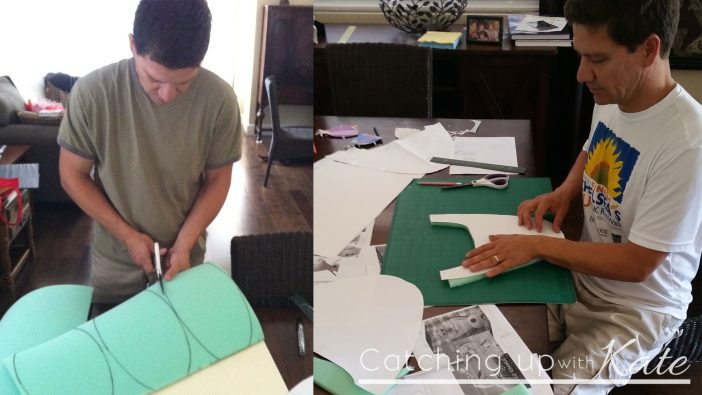
So here is Harry in all his costume making DIY glory and in his own words…….
OK, just so we a clear, this is time consuming.
The instructions here are your guidelines. You will have to adjust and modify the template and costume to your needs.
Materials
- White Felt Fabric
- Brown Fabric for Sleeves, gloves, eyebrows
- Orange Fabric for nose
- 1/2 Craft foam
- Contact cement and foam applicator
- Hair dryer
- Bike Helmet
- Lots of patience
Note about contact cement.
This cement glue should be applied to the foam. You must let it dry almost completely. Once it is dry to touch, bring the glued areas in “Contact” with each other. Press and hold. The cement glues to itself only when dry. This takes anywhere from 10-30 minutes depending on the temperature. I used a hair dryer for about 1 minute on each piece to speed things along.
How to succeed at this.
Read this tutorial completely first, then print out the templates and read the instructions there. I put the most instructions on the last template (Leg) so be sure to read through it all. You need to have a good idea about the whole process before you dive in. The templates are HUGE! Some are 4′ wide as it is actual size. You will need to go to a print shop to print these out.
Fabric comes in all kinds of sizes so calculate how much you will need ahead of time.
Use lots of patience and remember that this is just a guide. You will have to adjust and correct your costume. Plan for it taking up to 20 hours to complete. Here I am at work. It may take you 20 hours to make but I spent a lot more than that.
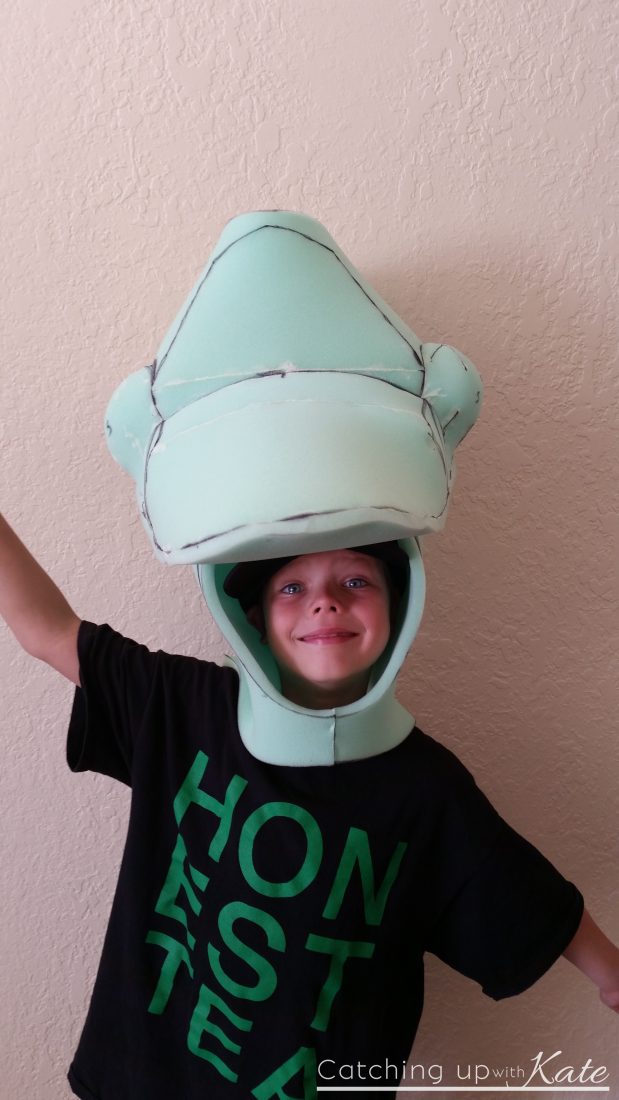
 The snowman head
 The snowman head
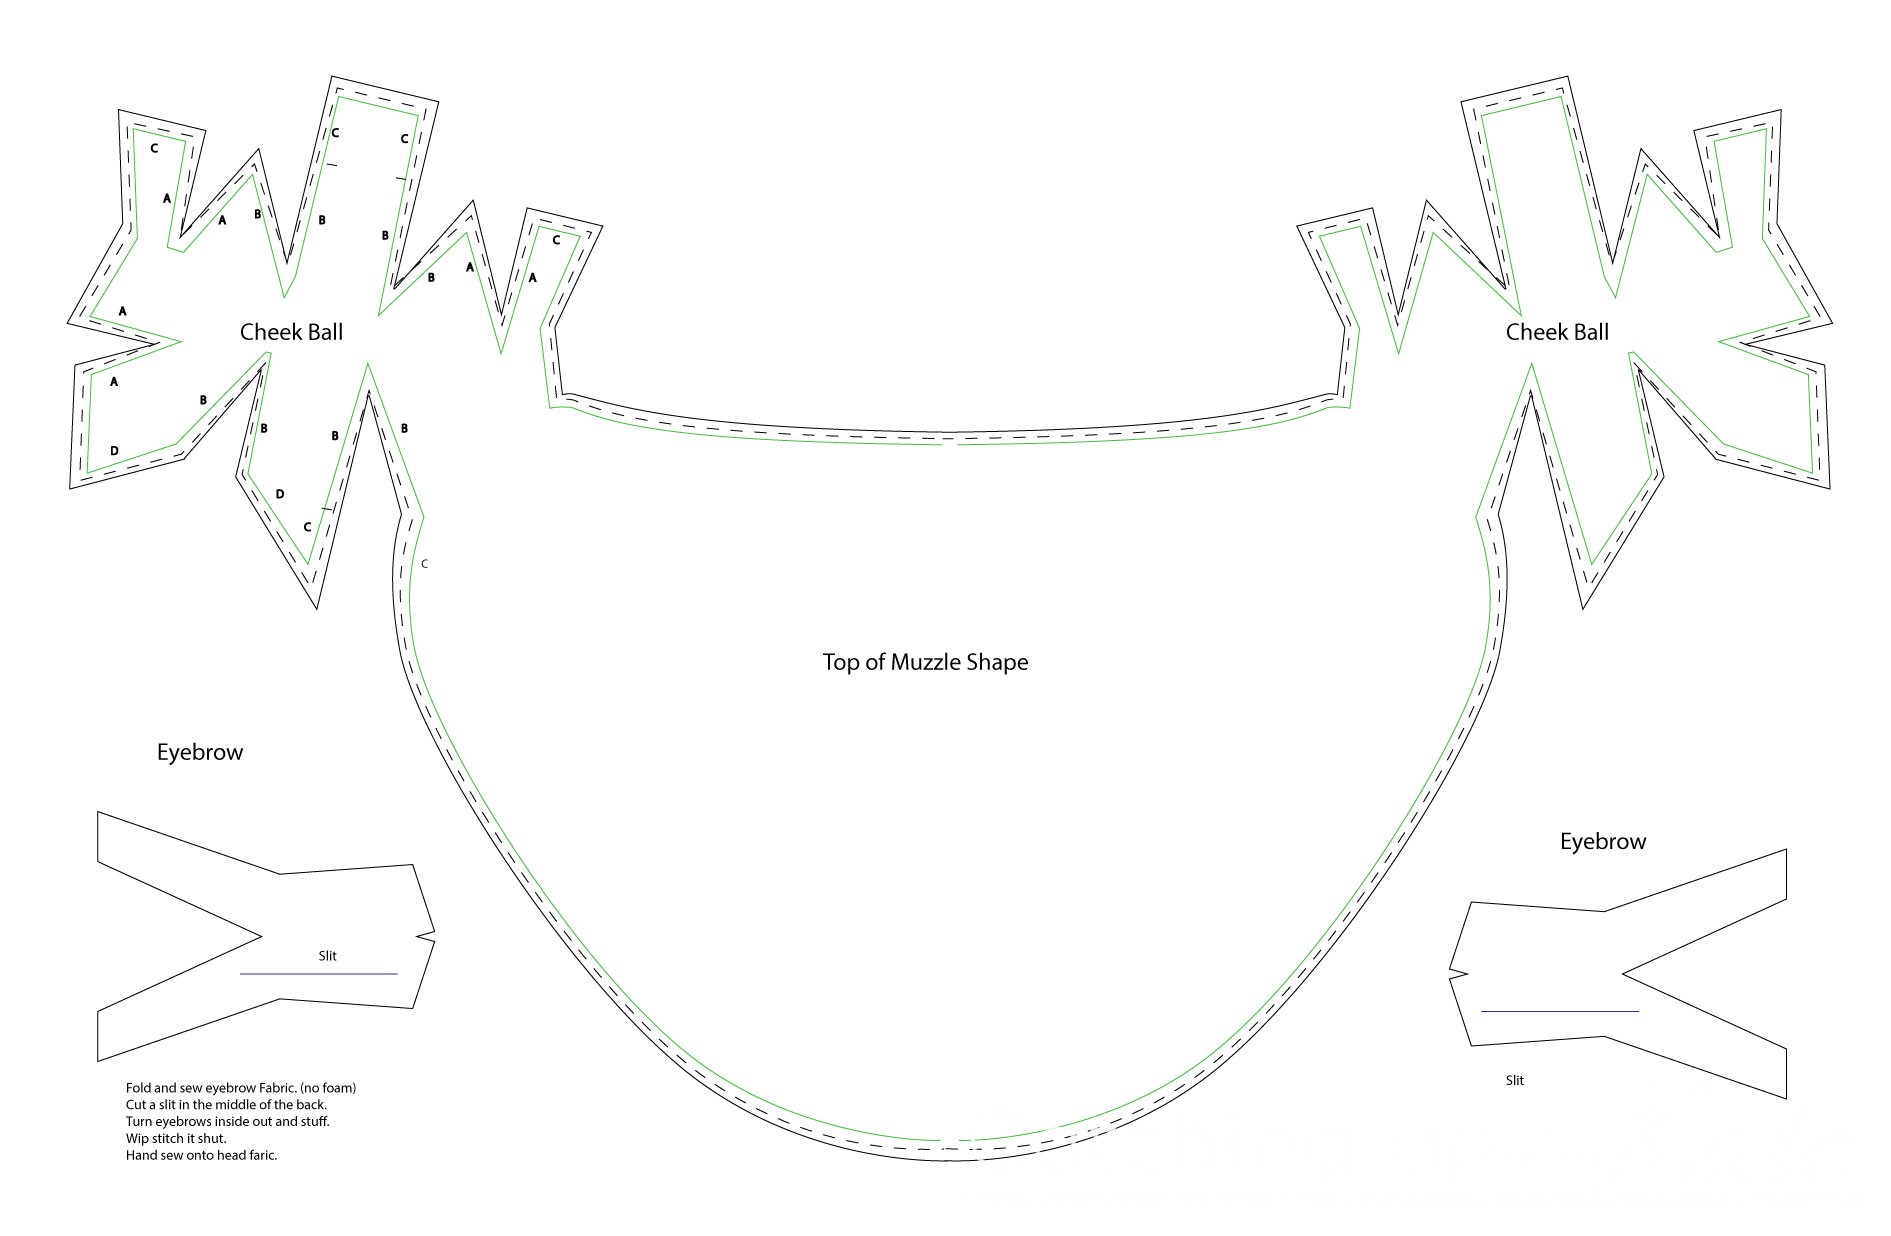
Study the main template carefully. First cut out the foam. They are indicated with green lines. Note the the front of the face is a separate piece that is glued on. This is needed so the face is flat and not rounded like the rest of the head. There is the circle top of the head piece, the upper head made of 2 pieces, the face, then the bottom half of the head. The muzzle is made of 2 pieces and has the cheek balls connected to it. This looks very odd, but it does work. Feel free to make up your own way to create cheeks too. Glue the head together then attach the muzzle to it. I did not glue the teeth in place but rather hand sewed it on. You can experiment with that too. Try the head on to be sure it fits. Remember to not glue the back seam in the lower section. You will need to open up the head to slide your head into it.

Bike Helmet.
Use a bike helmet to attach the head to your child. I used 4 inch thick pieces of foam that I shaped to the outside contour of the helmet. So – from the inside out you should have the helmet, foam shaped to the outside of the helmet, then the Olaf head foam. You can glue the thick foam in place or just enough so the helmet is snug in place. I glue my foam to the inside of the head. This took a little effort but was worth it.
Head Fabric
After you have your head foam shape made up, sew the main fabric. It is the same pattern as the foam. Make sure you do not cut the front face off the fabric like we did with the foam. The top circle was tough to sew, so cut the pattern down as needed. Sew the back seam and add the velcro to the bottom part of it. Sew the front chin together.
Next work with the gray fabric strip. Sew that to the inside gray fabric. Once those are done, sew them onto the completed head fabric. Use 1/4 inch to sew on. The foam is 1/2 inch thick so that is all you need to save. The gray fabric will be floppy until we spray mount it onto the inside of the foam.
Eyebrows and eyes.
Sew the eyebrows then cut a slit on the back side. Stuff them and wip stitch it back together. Hand sew it onto the face fabric. Cut the eye holes into the felt white fabric. Be sure to cut the hole just a little smaller than the actual foam eyeballs. The fabric should tuck under the foam eyeballs so no green foam shows through.
Nose
Sew your nose pattern together. Leave a gap on the bottom so you can turn the nose inside out and stuff. After you finish stuffing it, wip stitch it closed. Hand sew the nose onto the face fabric. It goes right between the eyes and should touch the edges. The nose is heavy so sew it on well.
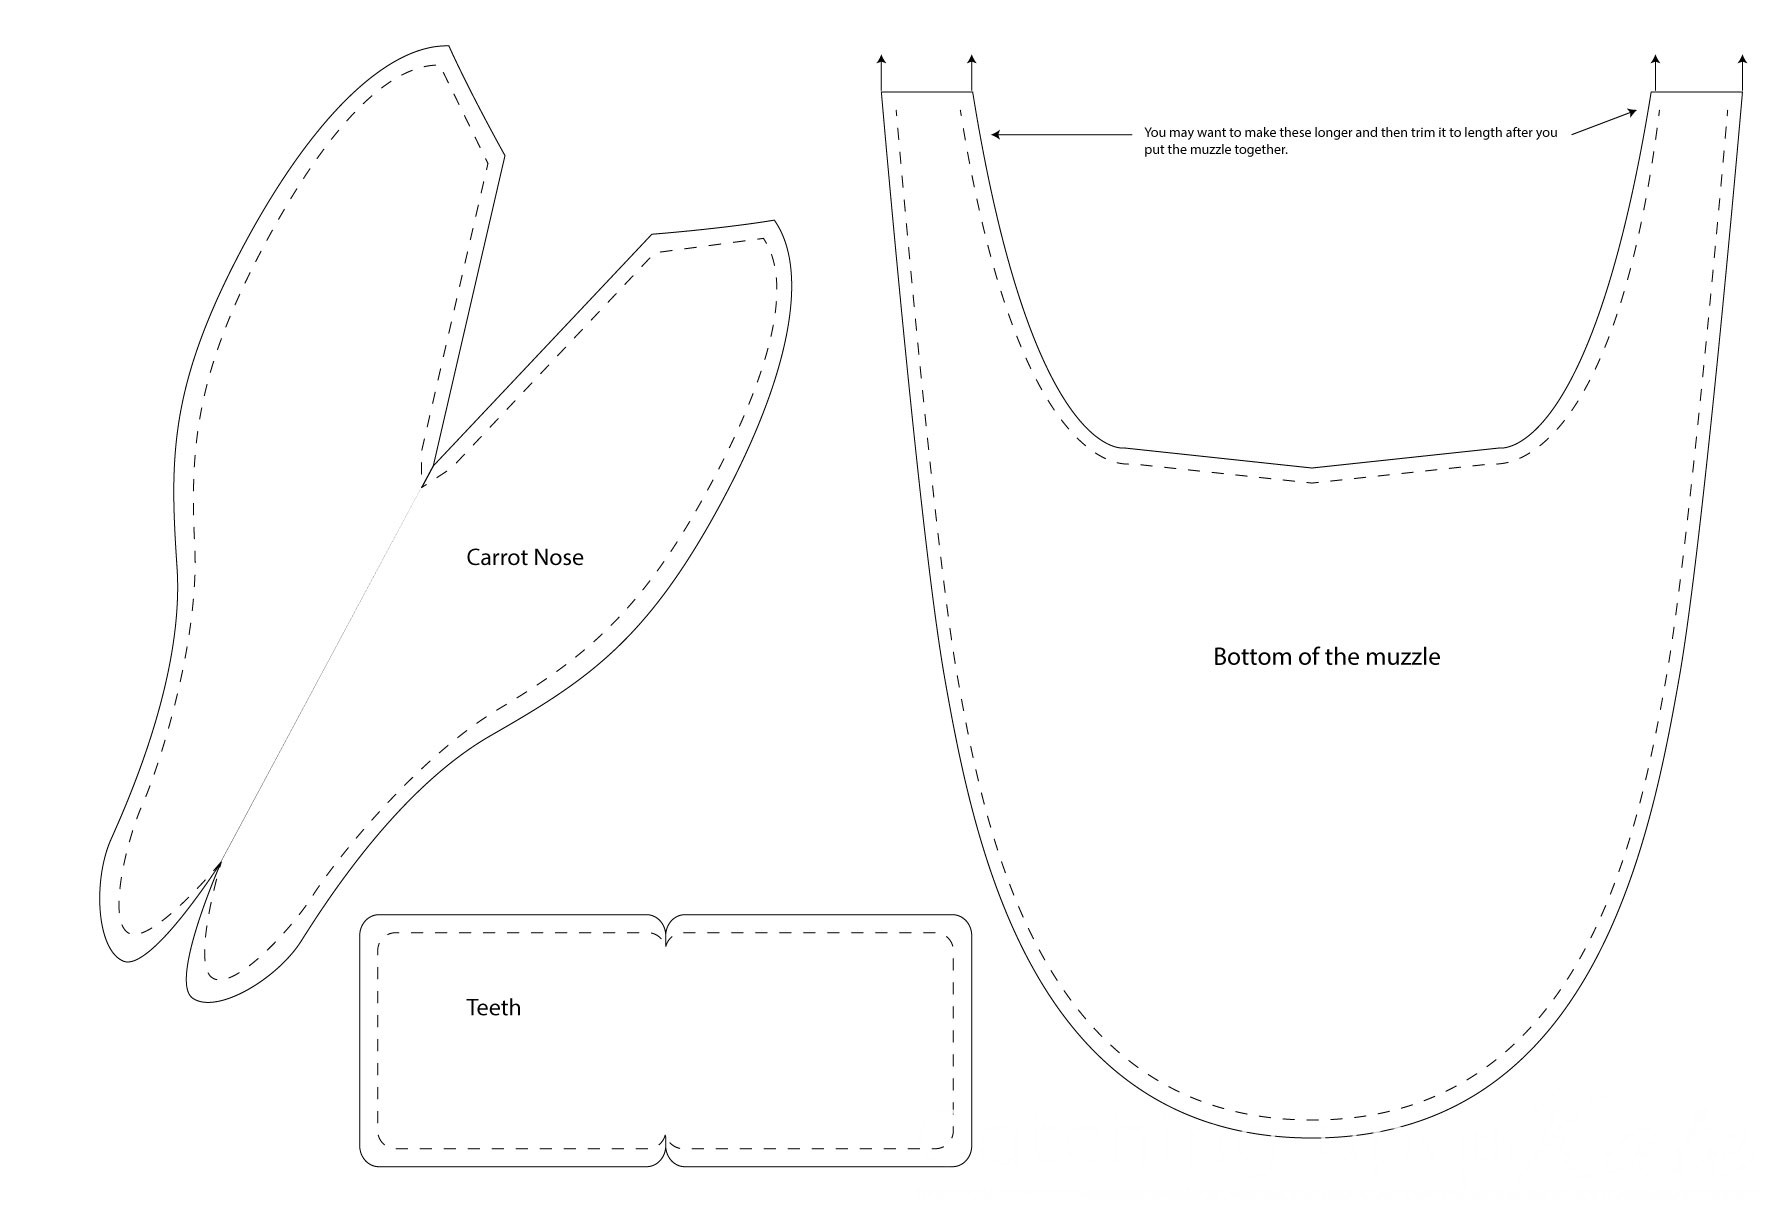
The muzzle (this is the most challenging part of the costume)
Sew the the check ball inside seams first (not the perimeter). In other words, make the ball shape first, the edges are going to be sewn last. Once these are done, sew the top to the bottom piece. You can carefully sew the muzzle onto the head piece. You should mark the muzzle shape onto the head fabric and cut it out. Then sew the seams together. If it is difficult, you will have to hand sew it. I was able to use the sewing machine to accomplish this so just be patient. The same thing has to happen for the cheek. Trace the shape and cut it out of the head shape.
Olaf’s buck teeth.
I used a smooth fabric for the teeth. It was the same fabric that I used to make the bottom of the legs. See below. Cut 1 foam shape and them sew the template. It folds in half. Sew the foam completely into the fabric. Hand sew the teeth onto the muzzle shape.
Putting the head together
Squish the foam inside the head fabric. You will have to carefully shape it in. Make sure the foam fills the head fabric well. If you make a mistake, remove the foam and fix it. You can also use stuffing to fill your fabric if you foam is too small. Remove the foam and sew the teeth in place. Be sure to test this all out before you sew the bottom of the carrot nose onto the muzzle. Once your nose is in, glue the eye balls in place. Color in the pupil first, then glue them in.
Put the helmet inside the head. Make adjustments as needed. The helmet can stay in the costume at this point. Try it on you child’s head. They should be able to turn their heads and look up and down.
 OK, I put the head first because it is the most exciting part. It is also the hardest part. I recommend making the legs first. Work your way from the ground up. Each piece up is harder to make. If you are still up for it, go on to the chest and sleeve below.
DIY Olaf Costume Instructions
The Chest and Sleeves
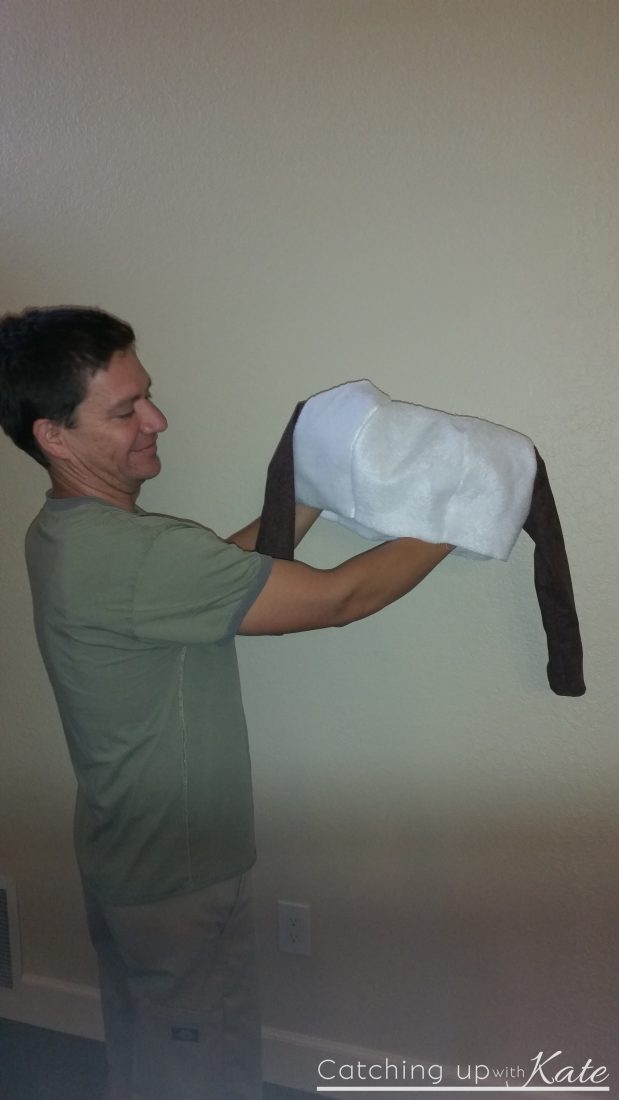
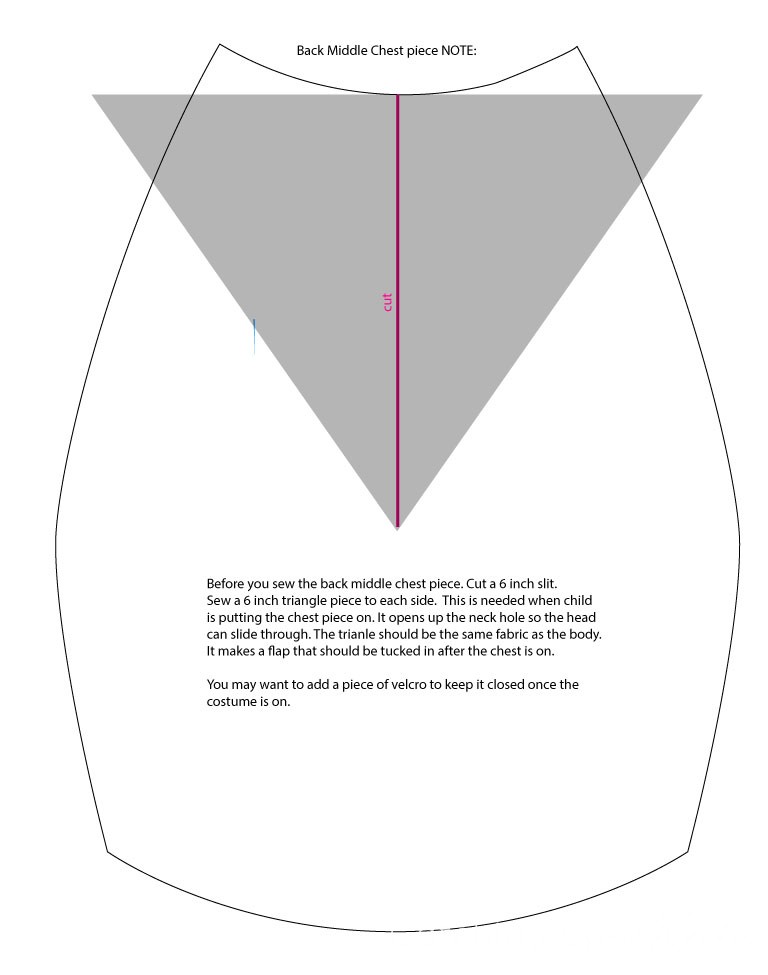
The chest is made up of 6 pieces of foam and fabric. The sleeves are made and added after the chest is partially assembled. Pay close attention to the pattern of the chest pieces on the template. You are making a front shape and a back shape. Note that you must add a triangle piece the back middle fabric. This should be done before you sew the side pieces on. See the image below. You can sew the fabric or glue the foam first.
On each side of the front and back foam shapes should be half of the sleeve hole. Do not glue along the top or bottom. The foam can be fully glued (all 6 pieces) but the fabric should be kept in 2 pieces.(front and back) Each of these is made up of 2 pieces of fabric.
Sew the top of the shoulder area together- Front the neck hole to the sleeve hole. Do not sew down the sides yet.

Cut the sleeves out. Be sure to measure your child’s arm length and add 1 inch to it. Pin the sleeve according to the instructions on the template. Follow the sew pattern. You will sew the sleeve into the hole first. Continue by sewing the side seams of the chest from the bottom up. When you reach the armpit, sew down the sleeve seam. Repeat for the other side.
OK, moving onto the Gloves and buttons. These are next.
The gloves
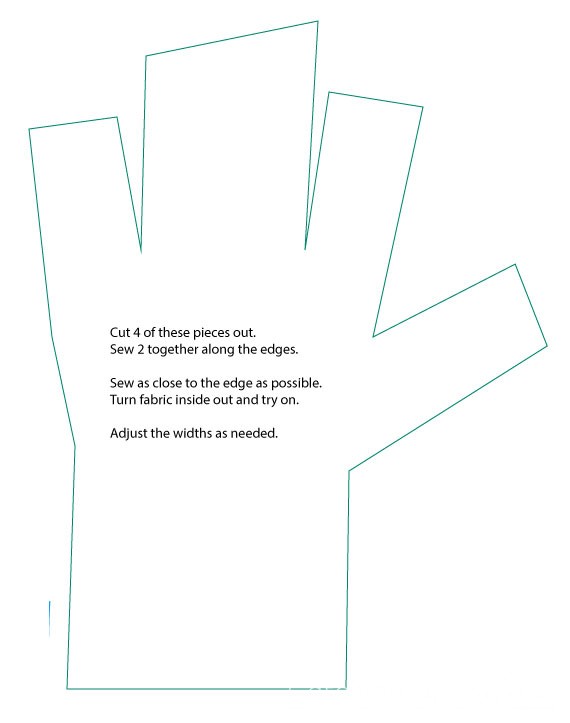
Use the glove pattern to sew 2 gloves. There are no right or left gloves. Use the same pattern for both. Note that Olaf has 3 fingers and a thumb. You can add elastic if you wish. It took me 6 tries to get the gloves so do not rush these.
The Buttons
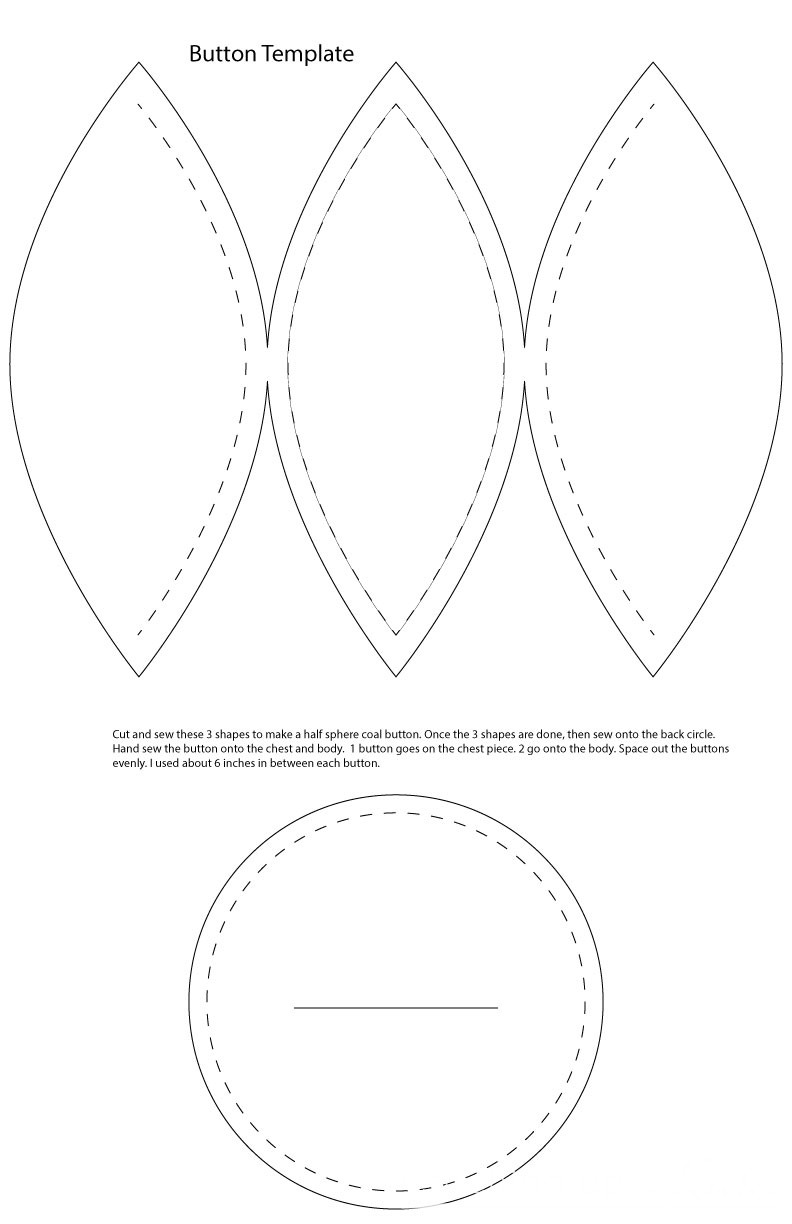
Using the button pattern and sew it into the half dome shape. Sew this onto the circle. Your buttons should look like half a coal shape after you stuff them. Cut a slit into the circle shape and stuff each of the 3 buttons. Wip stitch it close. You will need to hand sew it onto the chest and body pieces. Do this after the chest and body pieces are sewn together.
DIY Olaf Costume Instructions
The Body
This is made up of 6 pieces of foam and 6 pieces of fabric. Cut and glue the foam first. This takes time as the pieces are large. Sew the fabric and slide the foam into the fabric. I pinned the foam to the fabric at the top and down 1 seam. The foam will have a lot of static electricity which makes it hard to smooth out inside the fabric. I also make my foam a little too big. Dont be afraid to cut the foam down and re-glue as needed. I also hemmed the bottom so the fabric wraps tightly to the foam. Don’t do this until you have sewn the chest and body fabric together though.
 I am glad to see that you made it this far. The last piece is the leg. It is the easiest and I recommend making this one first. This will give you practice gluing the foam and fitting it into the fabric.
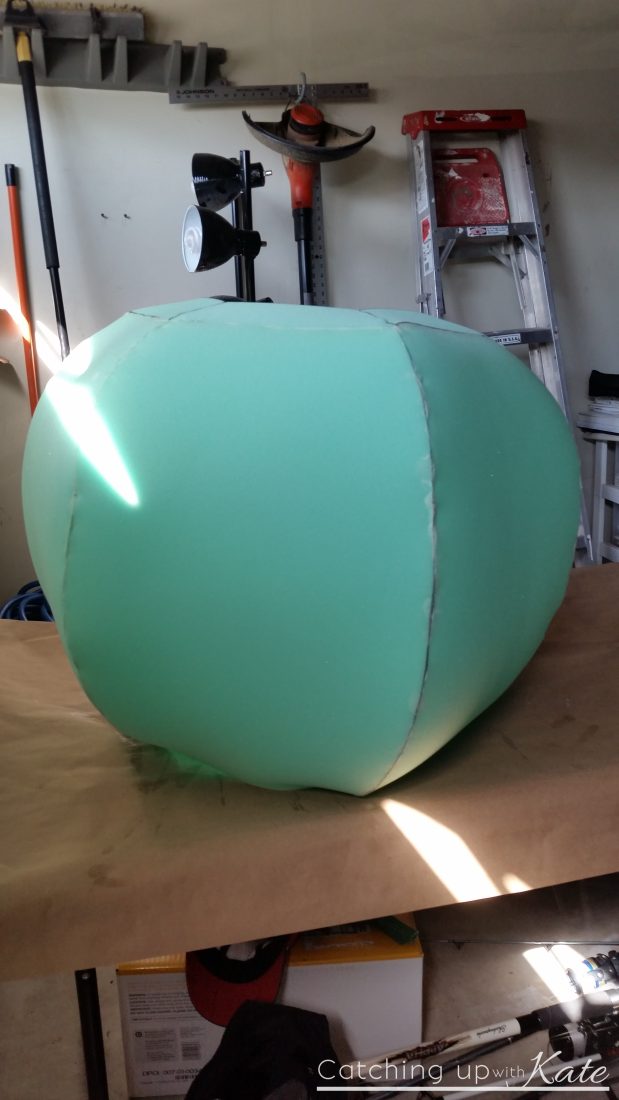
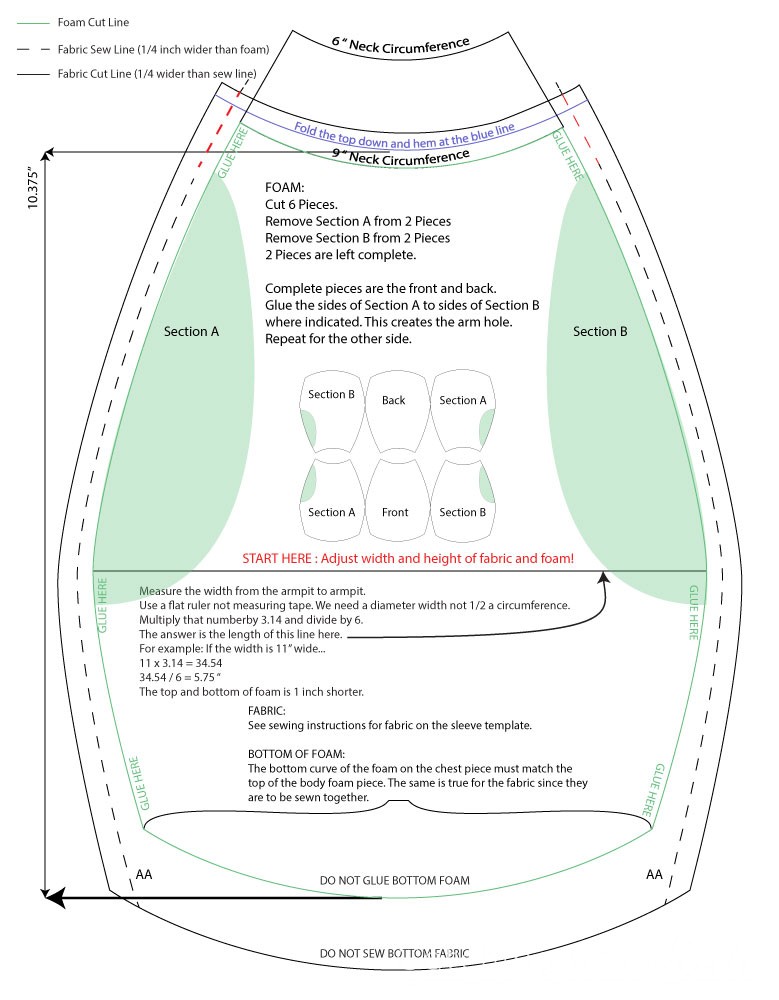
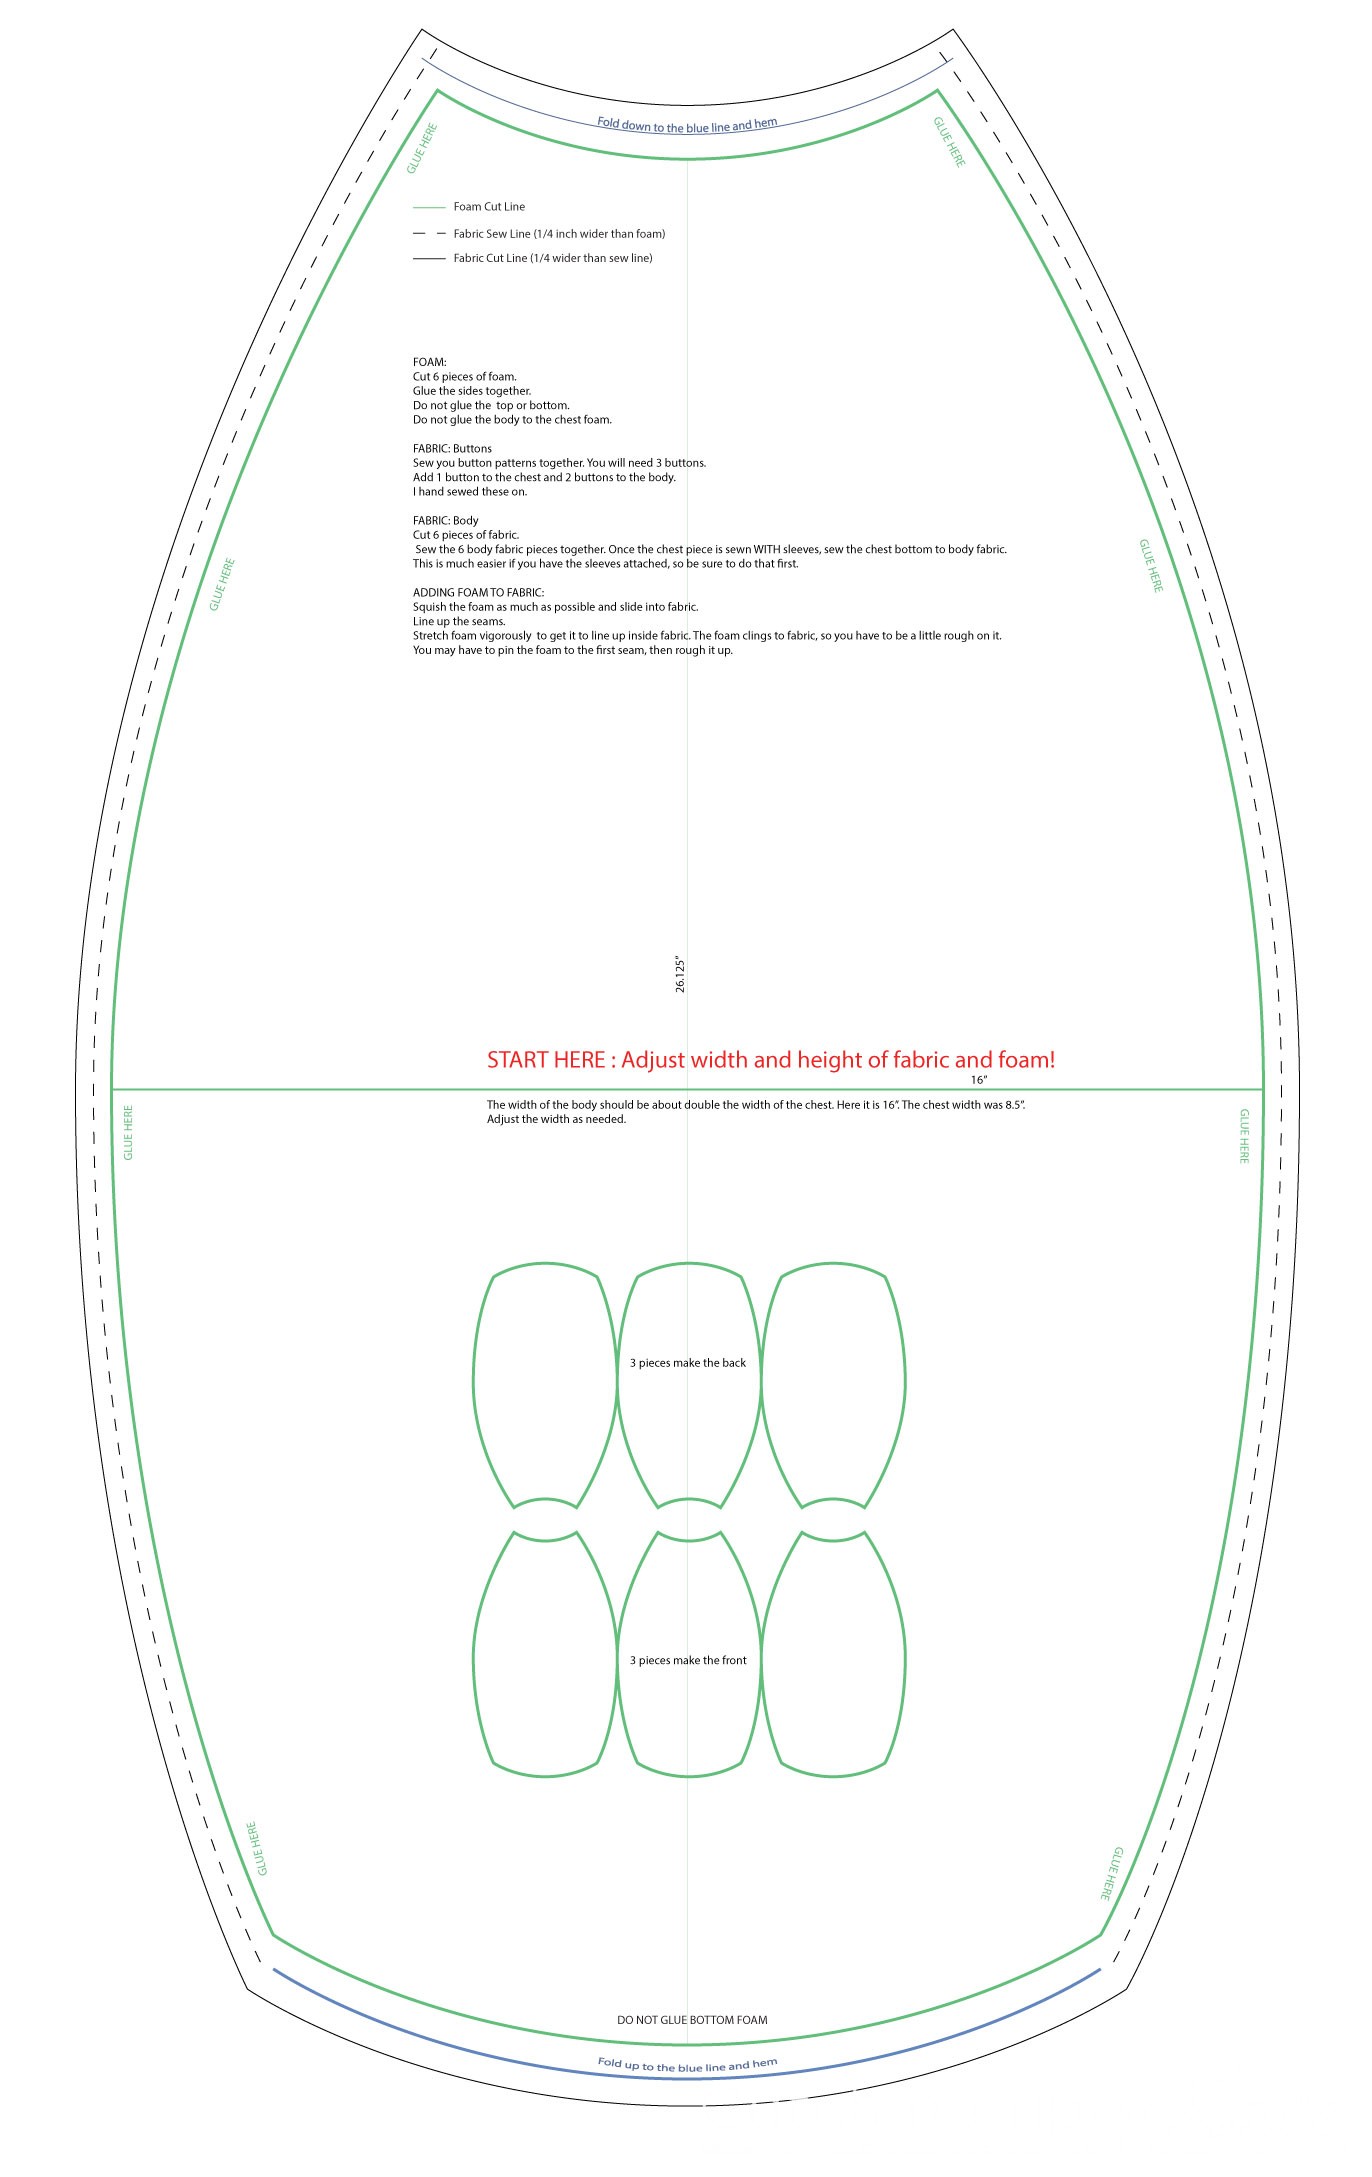
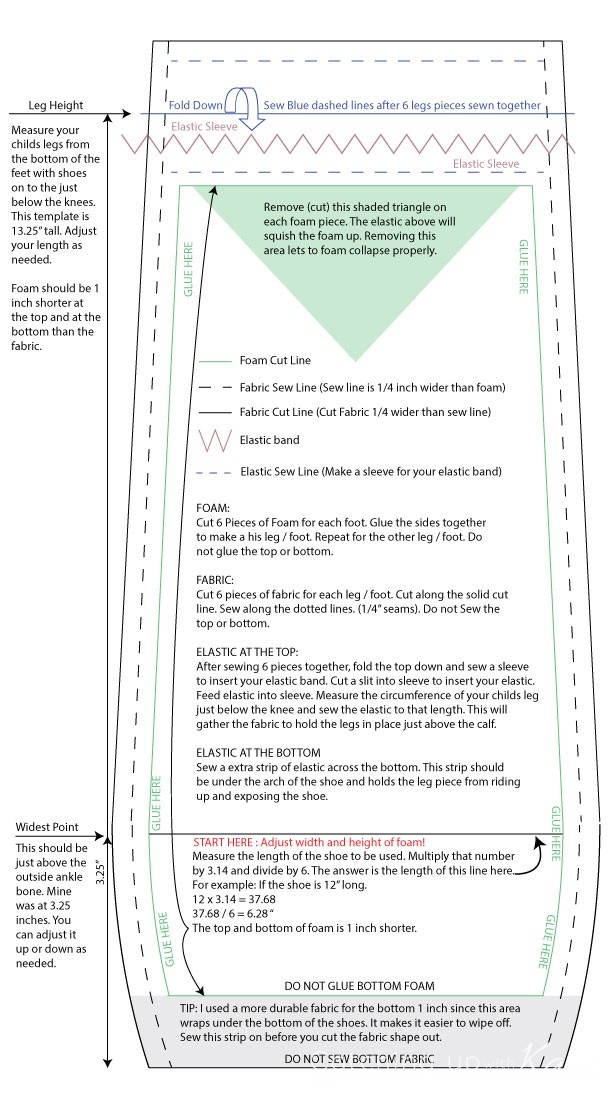
The Foot
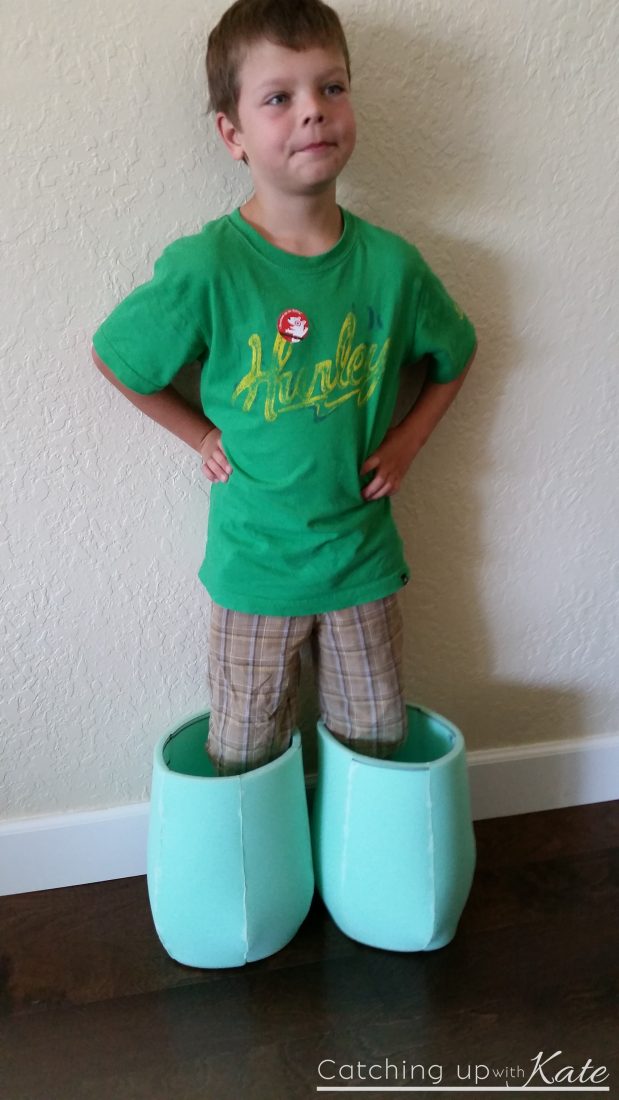 Follow the instructions on the template. You will need to adjust the height so look at that tip first. Cut and glue the foam together. There are 6 pieces per foot. Be sure to cut the top triangle out to allow the elastic to collapse. (See template) Continue with fabric. Sew it the same way as the foam. I added a different white fabric at the bottom so it would wipe off a little easier. This is totally optional.
Slide the foam into the fabric and try it on. If the size is good, add the elastic at the top and bottom next. The top works like a sock to hold it up. The bottom slips under the shoe so it leg does not ride up.
OK guys – the bad news is – if you have LESS than 3 weeks before Halloween you likely don’t have time to finish it –
the good news is you can get a kids costume from the Disney Store here – Kid’s Olaf Costume
If you are looking for an adult costume there are several options on Amazon (many with FREE Prime Shipping!) adult Olaf Costume![]()
*affiliate links used – we only share links of items we truly would use ourselves and only the best deals we could find!

[…] Elaborate Olaf Costume […]
Thank you so so so very much for sharing these patterns and instructions. They are very informative and well written. The only glitch is that the leg picture is not a link, it will not lead to a bigger picture, and it is kind of hard to read the instructions on the pattern. If this is not meant to enlarge then please ignore my comment lol. Again, thank you so much for sharing. I am making an adult sized costume and I will definitely share your site!
Hi Wolf – I believe they are all supposed to enlarge so let me ask my husband to double check and fix – it may take a day or so but please check back =)
Thank you so much for your quick response,…and for sharing your husbands work!
sure thing! He fixed the glitch last night – thank you for helping us find it!
Wow thanks!! These look great! My son will be thrilled!!
I might just have to make that!! That is awesome!
Thank you so much! You have just saved me!! Now I gotta get going n make this costume…I just hope it turns out half as good as yours! P.S. If I can’t afford that furniture foam, what else would you recommend? Some type of Quilting foam?
Theresa – I am sure that would work, he chose the furniture foam bc it made it much sturdier and he really wanted the body to poof out well – quilting foam will work it just wont be as sturdy – honestly this was a much more expensive project than we anticipated and I would suggest making something more budget friendly 😉 have fun!
Great job super-dad!!! I was in the same boat when my daughter saw Maleficent and decided daddy would make her the young Maleficent with actual working wings!!!! It turned out almost as good as your Olaf outfit! What we can’t and won’t create and do for our kids huh? Lol Congrats again.
oh man! I want to see it!!! Email us – I am serious!
Thanks for this great DIY instructions! I successfully followed the steps and recreated Olaf for my son for Halloween this year. It was a smash hit! You’re right, it definitely IS time consuming! I spent probably close to 40 hours on it, and that doesn’t include the 6 or so hours my wife also spent with me on it. I didn’t quite finish – I didn’t make the arms or gloves. I also had to rush attaching some of the stuff on the face – hot glue gun to the rescue!
I have a bunch of suggestions if you are interested in updating these templates at all. The easiest one would be to include a template for the “hair” on the top of Olaf’s head! I still need to make those for my son’s costume, but nobody really noticed it was missing anyway 😉
Will find your email and send some pictures!
Scott – I am SO excited to see pics! Yes! We would love to update our templates and it would be helpful – Harry was VERY rushed when making the template (once people saw the costume they were asking for instructions and that was never his plan, so it was rushed) – I bet your son had so much fun! email kate@highlightsalongtheway.com =)
So cute 🙂
Love this costume! I was wandering what kind of bike helmet you used 🙂 Was it one of those that look like a skate helmet?
Hi Stephanie – thank you! We used a standard child’s bike helmet – I think one without any 3-d type decorations is best – just any smooth bike (or skate) type helmet should do =)
Hi again!- thanks for your answer! where did you buy the craft foam ? 🙂
fabric store =)
Hello again 🙂
On the head template, is a piece of foam, which you say is to support the muzzle, where is this piece supposed to be on the head?
Hi there,
Thanks for the instruction. I am making this for a play for our company annual dinner. The muzzle part and the head, which part glue where? This part i cant manage to get it… I also make some amendment on the upper part of the body as it seems too short for me..
Where do you buy the craft foam?
Thank you so much for sharing your hard work. I am costuming Frozen Jr. for our community theater in December and really wanted to make Olaf rather than buy the costume. His head was the piece I was most concerned about. I must be missing something, but I am unable to find the second page. I keep scrolling up and down, but I don’t see the next button like I saw to get here. Can you possibly help me with that? I feel like a dork, lol.
Sorry, please check again. It should display properly now. There was a glitch in the code.
Fantastic – this is GREAT – I love the “head” What is the size you recommend when printing the template?
[…] Source: highlightsalongtheway.comDownload […]
This looks amazing! Can’t wait to try! However, I’m having trouble finding the next page? All I see is the instructions for the head.
hmm that is odd – let me check it out
[…] highlightsalongtheway […]
[…] Yes it is hilarious and cute and I am SO glad he made this DIY Olaf Costume – and if you want to make your own DIY Olaf Costume you have all the fun instructions here – DIY Olaf Costume Instructions […]
How large did you have the templates printed at the print shop?
hi there – sorry just seeing this – we drew our own templates – I think my husband who made it needs to make a better template and post it here as a download