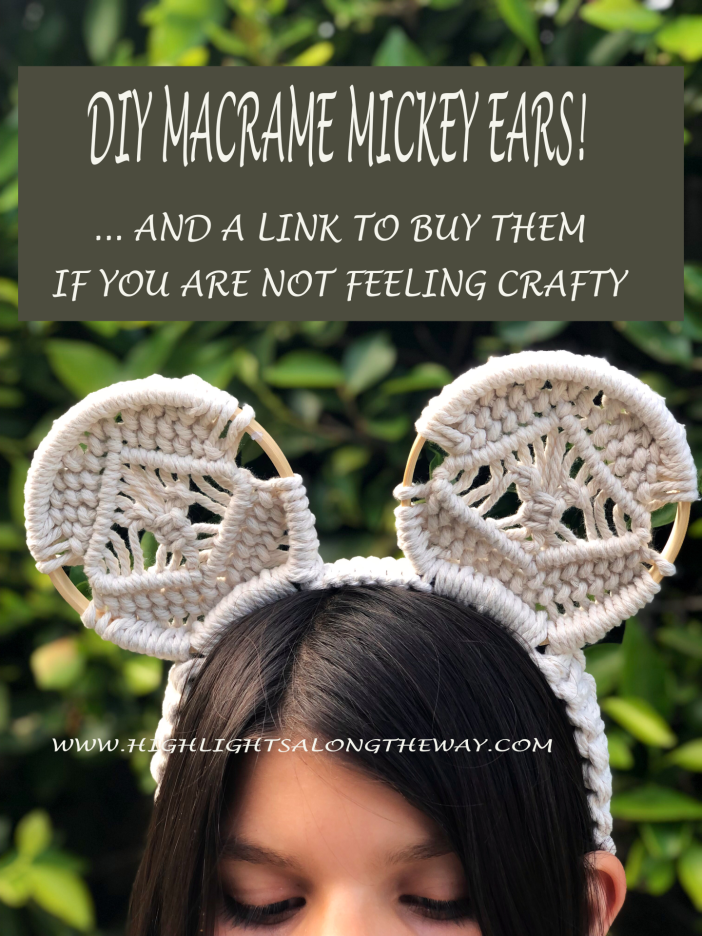
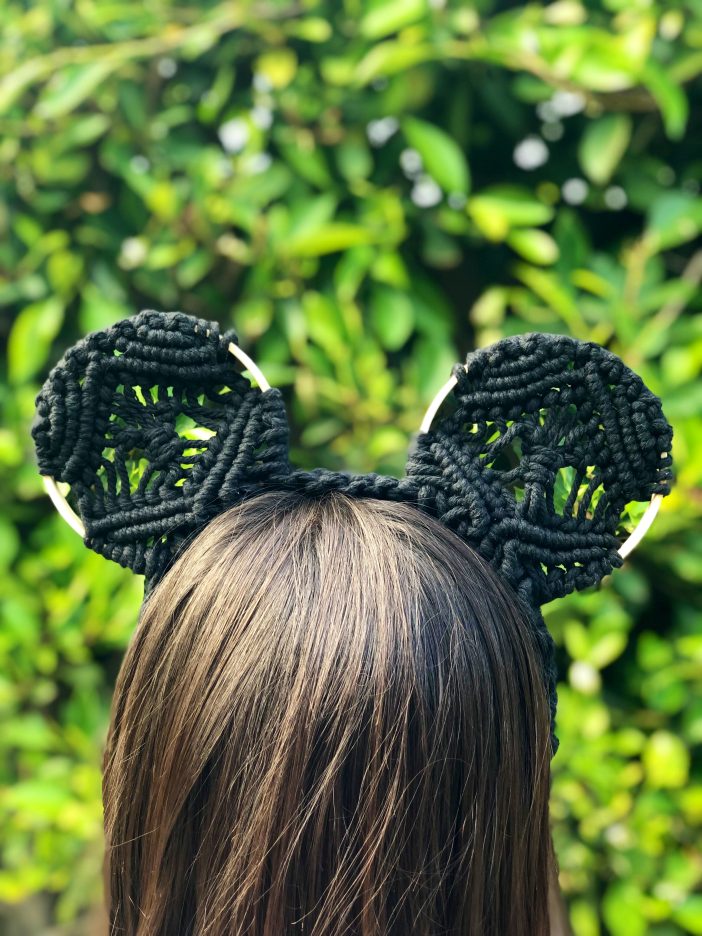
HOW YOU CAN MAKE EASY DIY MACRAME MICKEY EARS TUTORIAL, AND LINK TO BUY HANDMADE MACRAME MICKEY EARS
It’s time to step up your game with your Mickey ears. With DIY ears trending, new ideas and inventions need to be made. Thankfully, I just invented a new way to do it. Introducing: macrame Mickey ears. How to do macrame is super fun and cool to learn about, and these handmade ears are pretty easy to make. You can buy premade ones from my Etsy store: Macrame Mickey Ears – Etsy. Or you can use my easy-to-follow tutorial on how to do it yourself. These ears are super cute, unique, and comfortable. They look great in pictures and don’t pinch your head like some other headbands do. Mickey ears themselves have been around since the 1950s and there are so many DIY ways to make them yourself. With trendy macrame, you’ll take your Disney game to the next level. Make sure you check out Macrame Mickey Ears!
Nowadays, it’s hard to find unique things. That’s the main reason I was so excited to make these Mickey ears! I had so much fun making these for the same reason I had so much fun inventing new patterns for macrame wall hangings. When you try to keep up with the trends, you can very easily feel boxed in and confined to what is marketable. So why not be a trendsetter instead? It was awesome to have complete creative freedom without regard to outside influences because in this case, they didn’t exist. I didn’t need to overthink, which is the way that art should be.
The greatest thing is that I finished these just in time to take pictures in the parks. I was so proud to have made something so cool! In my years of going to Disney, I have seen a lot of different types of Mickey Ears. The classic hat kind, the movie-themed headbands, the endless variations of DIY of course, but I have never seen one involving fiber arts, especially not macrame. A few people have attempted to make macrame Mickey ears before, but they weren’t too successful and it never really caught on. I decided that needed to change. So here it is! If you’re experienced in macrame, check out the photos and instructions and make your own! And if you aren’t or just would prefer to buy them premade, you can get them made by me here: Macrame Mickey Ears – Etsy If you like to stand out from the crowd (which is hard in Disney crowds) this is the article for you.
THE HISTORY OF MACRAME:
Knots have been used for purposeful reasons since the beginning of human civilization, but it wasn’t until the 13th century that knotting became an art form. Macrame knots were first invented by Arabic weavers and artisans who used them to secure and tie off their woven fabrics. They weren’t yet arranged as art within themselves, but as a method of improving what already existed, the art of weaving.
European settlers, particularly sailors, stole the art and used it for sailing. The techniques became a prized possession of them. They used early versions of the Josephine knot, sometimes using 3 cords instead of 2, which is more commonly used today.
Eventually, it became popular in Europe and a decorative hobby shared amongst women. It surged in popularity during the Victorian era but then quieted down for a while.
More recently, macrame made a resurgence in the 1960s and 1970s, making statement decorations and contributing much to the hippie movement the 70s are famous for. Some of the most popular designs were macrame owls and plant hangers.
And guess what? Macrame is back again! Trendy wall hangings, owls, and plant hangers used to hold flowers, seashells, paintbrushes, fruit, you name it! Some modern variations of fiber arts involve the combination of macrame with crochet, weaving, or other types of textile techniques.

THE HISTORY OF MICKEY EARS:
Disney began its black-and-white cartoon era with Oswald the Lucky Rabbit in the late 1920s. And sadly, it is few and far between that he is recognized by anyone other than huge Disney nerds. The famous mouse we all know and love began his career in his first short: Plane Crazy (1928).
Disney Trivia: Most people think that Steamboat Willie was the first Mickey Mouse cartoon, but it is actually just the most famous. Bonus fact: Walt Disney voiced all the characters in Steamboat Willie, including Minnie! In reality, the first-ever Mickey Mouse cartoon was Plane Crazy, which most people don’t know!
But when were Mickey Ears invented? The first Mickey ears were seen in the 1950’s children’s show, The Mickey Mouse Club. All the Mouseketeers wore Mickey ear headbands and the idea exploded. With the popularity of the show rapidly increasing, Mickey and Minnie’s headbands began to be commercialized and sold in Disney stores and Disneyland officially in the 1980s. Disney World in Orlando, Florida, which opened in 1971, began selling them in the late 1990s. Among the first to purchase one was 10-year-old Amelia Liebhold in 1996.
THE INVENTION OF DIY MICKEY EARS:
Lately, the internet has boomed with DIY Mickey ears, along with other Disney fashions like Disney-bounding, DIY costumes/cosplay, and sometimes even the combination of all three.
There are countless variations of these, including fabric, crochet, plastic, foam, and even ones made of ornaments. You can find these on youtube and all over Google, but what you won’t find is Macrame Mickey ears.
WHERE YOU CAN PURCHASE HANDMADE MICKEY EARS:
You can purchase some handmade macrame Mickey Ears from my Etsy shop here:
They are currently available in black and off-white, but more colors are coming soon. I ship to anywhere in North America, and you can get yours for only 45 dollars plus shipping! However, if you are a macrame fanatic yourself, here’s a description of how I made them. If you’d like to make some yourself.
HOW TO MAKE YOUR OWN MACRAME MICKEY EARS:
Step 1. Gathering Materials:
You will need:
Macrame Cord: Any color you like! It just needs to be 2mm in weight and 3 ply. Here is a link to what I use: Macrame Cord

Thin, but Sturdy Headband: Here is an example. Headband for DIY Mickey Ears

4-inch Embroidery Hoops: You will need 2 per set of ears, here are some examples. Four Inch Embroidery Hoops (Mouse Ears)

You can also get the headbands and embroidery hoops at Michaels or other local craft stores. I have found that Amazon has the best prices and selection of the items I use to create custom Mickey Ears.
Step 2. Assemble your base headband:
Take two 4-inch embroidery hoops and cut out a section of each of them. (You can use the outer or inner ring, it’s all based on preference. These sections should be small enough to match the curvature of your headband and not be more than a few inches. Attach the small sections to the headband where you want the ears to be. You will need to use epoxy glue for this because regular or even hot glue won’t be strong enough for it. Then attach the rings to the little wood sections, again, use epoxy for strength. Allow curing for 24 before beginning the knotting process.
Step 3. Cut the lengths of the cords:
I usually do about 3-4 feet when folded in half (so about 6-8 feet), it doesn’t have to be perfectly exact. You will need 16 of these.
Step 4. Attach the cords to the top of the ears:
Fold the cords in half, and attach 8 to each ‘ear,’ with a lark’s head knot. You want the cross of the knots to face the back of the ears.
Step 5. Create the decorative attachment:
For each lark’s head knot, create one horizontal clove hitch on both sides of the knot, but take each cord and wrap it around the headband outwards. Repeat on both ears. Then scrunch the knots together in the center of the hoop, in relation to the headband. So the knots should be kind of at a diagonal if you’re holding the headband level. These should, like the lark’s head knots, be facing the back side of the ears.
Step 6. Begin knotting:
Choose one ear to start with. Since you attached the 8 cords with Lark’s head knots, you should have 16 cords to work with, because the 8 cords were folded in half. Start from the “back.” Take the outer 4 cords on both sides and create diagonal clove hitches on both sides. Then make a second string of diagonal clove hitch by adding another 2 cords to each, working towards the middle. This second layer includes 6 strings, (or three lark’s heads), on each side. You should have two Lark’s heads in the center or 4 cords. Cross the center two cords and the clove hitch all the way to the opposite sides.
Step 7. Secure the clove hitch.
Loop the loose ends from those 3 sections from front to back and after doing so add a clove hitch to the second from the first wrap-around and 2 clove hitches to the 3rd row from the 1st and 2nd wrap-around.
Step 8. Create outlines.
Flip the headband back to the front side. Do a 4th row of diagonal clove hitch on each side.
Step 9. Create the Mickey face in the center, and create a diamond.
Use the center 8 cords to make the face. You will make a total of 4 square knots. The ears will use the 3 outer cords on the eighth. That means that there will only be one holding cord strand. Then make 2 square knots between them, there will be 6 holding cords and 2 working cords.
Step 10. Close off the diamond.
Turn each side of the clove hitches around and knot in the opposite way to create a diamond shape. Then flip it back to the back side and make two rows of clove hitch on each side.
Step 11. Tie off the ear and repeat steps 6-11 on the other side.
Use clove hitch knots to secure and gather loose ends. Clove hitch down the sides of the rings, including loose ends as you continue working down. On the inside, take 4 cords and make a square knot sinnet that covers the area in between the ears. With the remaining cords from the inside, continue the gathered clove hitch technique and reinforce the bond between the ears and the headband by knotting tightly. On the outside, work only down the side of the side of ring, only use the inside clove hitch to complete the ring. Then, with the longest pieces as the working cords create a square knot sinnet surrounding the end of the headband.
Then repeat all of this on the other side of the ear. (Steps 6-11) Make sure to include the loose ends from the sinnet that connects the two ears.
Step 12. Tie off the two ends.
At this point, you should only have loose ends at the ends of the headband. To tie these off, wrap a thread tightly around the ends a few times and tie it off. Then with a thick needle sew through the ends above the wrap around multiple times, back and forth. The smaller and more dense the stitches, the better. Then just trim the ends, and you’re finished!